Did you know that you should check your clutch levers after three hours of riding your bike? This may sound a little extreme, but ensuring that your clutch lever is working at its best is an extremely important task. If your clutch lever is not working at its best, there’s a higher risk of your bike slipping. You will have weak clutch control and inconsistent usage.
Prevention is key. Find out how to replace the clutch lever on a Harley Davidson bike.
Table of Contents
How Do I Know My Clutch Lever is in Poor Condition?
You will need to inspect your clutch lever visually to recognize if it needs adjustment or replacing. Look for cracks, nicks, and corrosion. These are signs that you need to work on your clutch lever.
Also, if you notice that the lever is severely damaged or worn out, you need to replace it. For the best results, inspect the lever from the engine to the handlebar. Take your time so that you can see every inch of this component.
How Do I Change My Clutch Lever?
Your clutch lever may have worn out enough that it needs to be replaced. You can take your bike to the repair shop, but it would cost you more.
Why not do it yourself? Here’s a simple guide.
Remove the Circlip
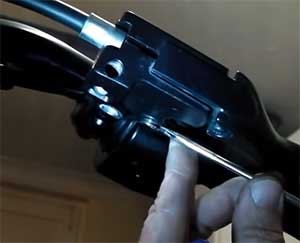
- When changing the clutch lever, remove the circlip that is fitted underneath. It will be easier to access this if you remove the rear-view mirror that sits on the handle. Take two flat-headed screwdrivers and pull out the circlip smoothly from the socket.
- Once the circlip is out, push the main drop-pin from the lever out. Keep these screws and pins safely. You will need them later.
- Remember, you cannot remove the lever entirely yet. You still need to adjust the bottle screw, which is attached to the cables close to the engine.
Adjust the Clutch Cables
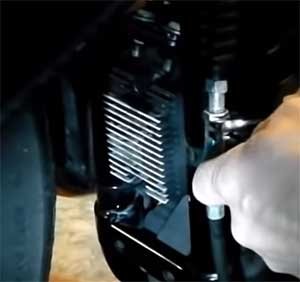
- Before adjusting the clutch cable, remove the clips that hold it together. They’re quite big so you can spot them easily.
- Once you remove the clips, you will be able to adjust the clutch cables. Lift the clutch cable up because it’s bigger at the bottom than it is at the top.
- Then, adjust the bottle screw using a ½ inch and 9/16-inch opening spanner. Undo the lock nut entirely because you will need all of the slack of the cable.
- Bring that cable up the same way you did with the jam nut. This shortens the outer part of the cable, making it easier to remove the clutch lever.
Remove the Clutch Lever
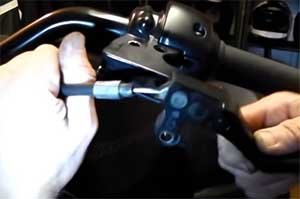
Once you’ve adjusted the lock nuts, you can safely remove the clutch lever without any problems. The lever is attached to a plastic wrist pin that connects the clutch wires to the lever. Removing the pin will cleanly separate the lever from the wires.
Now, you’re ready to change your clutch lever.
Place Your New Clutch Lever
- Take your new clutch lever and gently wedge it back into the holder you removed the old lever from.
- Remember, you don’t need to apply too much pressure. The holder is designed to fit the lever perfectly.
- Get the same plastic wrist pin that was attached to the cables and the lever and push it back into the new lever. This is quite simple because you don’t need to screw anything in.
- Now, you’re set to put the clutch lever back into its holder. Once it’s in, take the drop-pin you set aside earlier and push it back into the main socket.
Remember, don’t get worried. Changing clutch levers is quite easy because there aren’t a lot of nuts and bolts to deal with. But if you aren’t sure about what you’re doing, you can take your bike to a repair shop.
Set Your Slack
We’re halfway through with changing the clutch levers on the Harley. What you need to do now is set your slack.
- Grab your cable and straighten it.
- Move it so that it faces away from the clutch lever.
- It’s best to note down what the cable looked like before so you can place it in the same position.
Undo the Bottle Screw
Once you’ve set your slack, you need to undo the bottle screw to get the cable into its clamp and make it rest perfectly. Remember to keep your Harley Davidson repair manual handy to understand the perfect slack setting for your clutch lever.
- Make sure that there is enough slack so that you aren’t putting any weight on the clutch plates which are down in the clutch pack when it’s rested.
- The official slack measurement in the Harley Davidson manual is 3 millimeters. This distance allows for heat expansion and contraction due to weather conditions.
- Keep adjusting the lever till you reach the required distance.
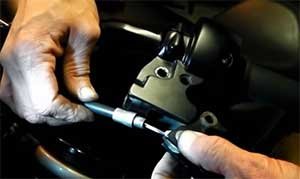
Tighten the Lock Nut
- After you get your measurements and set the clutch lever, bring the lock nut down and tighten it with two screwdrivers. Don’t tighten it too much.
- Then, pull the rubber cable down. Keep in mind that this rubber cable isn’t weatherproof.
- Squirt some WD-40 on it. That will lubricate the surface adequately and protect it from harsh weather conditions.
Lock the Clutch Cables
- Lock the cables with the clips you took out earlier. This will keep the cables intact and protect them from breaking or loosening.
- Make sure that you don’t pinch or rub any other parts while doing this. Otherwise, the friction will wear out the parts even more, and you don’t want that.
- Finally, take the circlip that you took out in the very first step and screw it back in. This will keep the lever intact.
You will need to fiddle with the circlip a little because it’s quite small. But you’ll eventually get the feel for it and it’ll fall into place.
Tips for Replacing the Clutch Lever
Avoid Scratching Any Parts
You must remember that the parts in your clutch system are delicate. They wear out faster especially if you nick or scratch them. When you’re changing your clutch lever, be extra careful when you handle these parts.
Create a Designated Workspace
In my experience, this helps quite a bit. Plan out when and how you want to change your clutch levers. Create a dedicated workplace where you will keep the parts and tools. When each part is safe and accounted for, it becomes so much easier to maintain your bike.
How Do I Keep My Clutch Lever in Optimum Condition?
Even though this article is about changing your clutch levers, you shouldn’t let your bike reach that stage. Here are a few steps to ensure that your clutch lever works well for a long time.
Lubricate Your Clutch
Most bikes nowadays have wet clutches. A wet clutch is lathered with engine oil because it cools and smoothens various parts of the clutch. Wet clutches can endure rough weather conditions better than dry clutches. They have a longer lifespan than their counterpart, a dry clutch.
If your bike has a wet clutch system, you must oil it frequently. Otherwise, the components inside will dry up and corrode.
Press the Lever Only When Needed
You may not realize you’re doing this, but you might be pressing the clutch throughout the entire ride. This habit can wear out the clutch lever faster than usual. Remember to only use the clutch when required. Don’t rest your hand on it at all times.
Avoid Aggressive Clutching
If you like doing burnouts or wheelies, your clutch lever will wear out much faster than usual. When you aggressively pull and release the clutch, the clutch plates, outer basket, and the grooves on the inner hub will wear out. That can cause slippage and similar problems.
Conclusion
Changing the clutch lever on your Harley Davidson is quite easy! If it’s your first time replacing the lever, it may take you a few extra minutes to finish. The average time to change and adjust a worn-out lever is anywhere between 15 and 20 minutes.
Since you need to do this every 20,000 miles or so, you will soon get the hang of it.
That is why it’s best if you do this yourself. Repair shops can charge an unnecessary amount of money for a job that can easily be done at home. These fees go up for premium bikes like the Harley Davidson.