You may not realize this, but changing your Harley Davidson seat is an integral part of the bike maintenance process. There are multiple reasons why you’d need to replace or remove your seat. For example, your old one may have worn out, is torn and you need to install the new seat. Or you may simply need to access some of the other components of the bike.
There are multiple models out there that have different seat removal methods. To ensure that you keep your two-wheeler in good condition, refer to this guide on how to remove the seat from a Harley Davidson Ultra-Classic.
Table of Contents
Materials Required To Remove the Seat
One of the most important things you must remember is that not all Harley seats are the same. Therefore, you may require different tools for different Harley models. To understand the kind of seat you have, I suggest you go through your bike’s service manual. This little booklet has all the information on the build of your Harley Davidson.
To remove the seat from your Harley Davidson Ultra-Classic, here are the tools you will need:
- T-25 star bit
- 7/16 socket or a regular nut drive
- Cordless screwdriver
Once you have all these materials, you can move on to removing the seat of your Ultra-Classic.
Removing the Seat of Your Ultra-Classic
One of the main things before removing the seat is taking out the backrest. The backrest on the Ultra-Classic is not like most Harleys. A majority of Harley-Davidsons have two rods in their backrests that you have to squeeze together to be able to pull out. The Ultra-Classic, however, requires the use of the T-25 star bit and a 7/16 socket or regular nut drive mentioned earlier.
Understand the Anatomy of the Seat
Before you start, understand that there are three main components to the Ultra-Classic saddle: the backrest, the strap, and the rear fender. You will have to remove the backrest, remove the strap which is bolted in by a nut, and lastly, you will have to remove the back nut off of the rear fender.
Caution
Before removing the strap, understand which side of the strap is dismountable because one side is stationary while the other isn’t. If you’re having trouble understanding this, refer to your service manual.
Remove the Strap
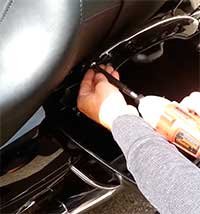
To remove the strap from the seat, you will need to remove the cap of your saddlebag first. You don’t have to dismount the saddlebag from your bike. Simply remove the top cap and you’ll find the bolt that holds the strap in.
Most probably the strap will be fastened with a quarter-twenty bolt. Hence, it’ll come off easily with your cordless screwdriver. Once the bolt is out, take the strap and flip it to the other side. Keep the bolt in a safe place. You don’t want to lose it.
Remove the Back Nut Off the Rear Fender
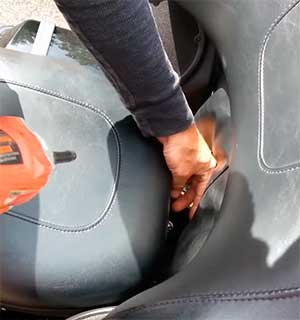
The back nut is located inside the rear fender. This means you’ll have to jiggle the rear fender a bit to be able to spot the back nut. Again, if you’re unsure about the location, simply go through your service manual.
Take the cordless screwdriver and unfasten the back nut. It shouldn’t be too challenging. There should be 2 bolts that hold the rear fender. Make sure that you’ve gotten them both out. Once the bolts are out, the seat is essentially loose. All you need to do now is remove the backrest.
Remove the Backrest
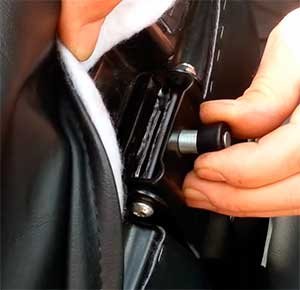
Removing the backrest is probably the trickiest part of the process. This is why we went ahead and loosened the other components first. Before removing the backrest, take a picture of what it looks like. This will help you remember the position of every component.
First, you’ll want to get the nut drive on the cordless screwdriver and move it over to the rear of the backrest. You’ll see a little push-pin that’s attached behind the backrest. The push-pin essentially helps to raise and lower the backrest. You won’t be able to loosen the backrest yet because there’s a bolt that runs through the metal body that holds the push-pin.
Loosening One Side With the Nut Drive
The interesting bit here is that the push-pin is bolted in with two nuts on either side, both of which are different from each other. From one side you’re going to unfasten the bolt with the nut drive. You’ll need to check each bolt thoroughly before loosening the screw.
Once you’ve loosened the bolt with a nut drive, store the bolt safely because you will need it later to reassemble the seat.
Loosening the Side With the T-25 Star Bit
The side opposite to the nut drive can only be opened with the T-25 star bit. Follow the same process when you loosened the earlier bolt. Remember, hold the metal plate while loosening the screw with the star bit. This is because there are two nylon washers inside that you don’t want to lose.
Once the bolt is out, store it safely. Next, you’ll spot both nylon washers. Remove them and keep them with you. After doing so, you can essentially lift the backrest off its mantle.
Take the Seat Out

After you’ve followed these steps, you can now remove the seat with ease. Remember, there’s a small metal clip attached inside the seat. Therefore, you want to pick up the seat at an incline and slide it out so you don’t damage the metal clip or the seat.
You can now access other components of the bike or you can replace your seat with a new one. Remember to fix the seat the same way it was earlier. Refer to the picture you took earlier to fasten the bolts in the same positions in the backrest too.
Why You Should Remove Your Motorcycle Seat
If there’s one area on a motorcycle that has a chance of wearing out faster, it’s the motorcycle seat. However, changing or removing your motorcycle seat should be your last resort. Unless you have to remove the seat to access other components of the bike, there are multiple options out there you can consider making your seat more comfortable.
The Seat Wears Out
One of the most common reasons for changing or removing motorcycle seats is because they are worn out. Common factors that lead to wear and tear are sunlight, friction, sweat, and water.
However, you don’t need to change your seat frequently. Normally, a saddle starts wearing out after a year of normal use. If you see minor signs of wear and tear like scratches and discoloration, you don’t need to worry. On the other hand, if you notice deep gashes where the foam inside starts gushing out, you will need to change the seat.
Conclusion
You’ve probably never considered changing the seat on your Ultra-Classic or any bike for that matter. However, the seat is an important component of your bike. You can always go to a bike repair shop and get the seat fixed.