Are you concerned that your Harley Davidson’s regulator could be on its last legs? Does your bike sputter when you ride it? Or does it simply not start when you try and get the engine running? If you’re facing any of these issues, you may need to test the voltage regulator on your Harley Davidson. Don’t skip this task. You don’t want to be stranded in the middle of nowhere with a bike that won’t start.
If you’re not familiar with this task, I have you covered. Here are step-by-step instructions for testing the voltage regulator of your Harley.
Table of Contents
What Are the Components of a Bike’s Charging System?
When your bike isn’t functioning properly, there’s a high chance that there’s something wrong with its charging system. It’s important to understand which part is faulty before you attempt any repairs.
Here are the 5 main components that form a bike’s charging system.
- Voltage regulator
- Battery
- Alternator
- Cables
- Switches and fuses
In this article, let’s focus on dealing with the voltage regulator.
What Is the Function of a Voltage Regulator?
When your motorcycle is running, the regulator takes in current from the alternator and converts it to Direct Current (DC). This allows your battery to charge. If there’s any excess current, the regulator simply converts that to heat.
That is one of the reasons why voltage regulators heat up so quickly. Because of the temperature changes, your bike’s regulator has a long and grueling lifespan. Usually, the regulator starts to fail once a bike has covered close to 31,000 miles.
How Do I Know My Voltage Regulator Isn’t Working?
Regulator Overheats
Now that you know the function of the regulator, you probably understand that it’s naturally at a disposition to overheat. After continuously converting current from the alternator to Direct Current for the battery, the regulator can get fried. Remember, it converts the extra current to heat. Too much heat can make this part conk out.
Battery Dies
A bike battery functions best with 12 and 14.5 volts of electricity. If your regulator isn’t converting voltage from the alternator properly, it may send close to 20 volts. This excess power can cause the battery to die out. Keep in mind that bike batteries should be changed every 5 years. After that period, your voltage regulator may be fried.
You Have Loose Wires
What if you inspected your bike and found no obvious issues with your regulator and battery? You may simply have loose wires in your charging system. Hitting bumps or potholes can loosen or dislodge wires in the charging system. The constant jarring can damage the connections between the regulator and battery.
Make sure the necessary wires are secured before and after you ride your Harley.
Tools You Need to Test the Voltage Regulator
There are a few tools that you require to test and change your regulator.
- A multimeter
- A ⅜ inch socket wrench
- Needle-nose pliers
- An Allen wrench
- Gloves
Testing the Voltage Regulator on a Harley Davidson
Charge Your Battery
Before you start testing your regulator, ensure that your bike’s battery is charged. Otherwise, you may not get accurate readings from the multimeter. You have to remove the seat from your bike to charge the battery.
Test the Voltage with the Bike Engine Off
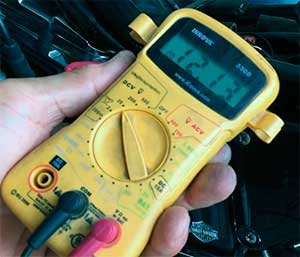
After charging your battery, you can now test the voltage from the regulator. Take your multimeter and test your voltage with the bike engine turned off.
What does the multimeter reading mean?
- If the reading from the multimer is above or at 12.4 volts, then you have nothing to worry about.
- If the voltage is less than 12.4 volts, then you may need a new battery.
Is your Harley brand new? Have you changed the battery within the past few weeks? In either case, you need to double-check why your battery died out this fast.
Test the Voltage with the Bike Engine On
Now, do the same test with the bike engine turned on. Let the bike heat for a bit before checking the voltage.
- When your bike is idling, the reading on the multimeter should be between 12 and 13 volts.
- Once you hit the throttle, the reading should not exceed 15 volts.
If the voltage does not reach 12-13 volts, then you probably have a faulty regulator. However, you need to check and change your regulator if the reading exceeds 15 volts when the bike is revved up.
Changing the Voltage Regulator on Your Harley Davidson
If your voltage regulator did not match the ideal settings on the bike, then you should replace the part. There’s usually no need to bring your motorbike to a mechanic for this simple task. Replacing a voltage regulator is fast and easy with this guide.
Disconnect the Regulator
The first step is to disconnect the old regulator. Regulators are placed differently depending on the motorbike model. If you don’t know where this part is on your Harley, check the service manual.
Once you spot the regulator, you will notice that it’s fastened with two ⅜ bolts — one on top and one on the bottom. Disconnect each of those bolts with your ⅜ inch socket wrench. You should be able to remove the bolts with ease. Make sure you keep the voltage regulator bolts in a safe place. You will need them again later.
Unplug the Two-Wire Connections from the Alternator

After removing the bolts, you must unfasten the two wires that are attached to your alternator. These are usually under the regulator. If you can’t find the wires, refer to the service manual of your Harley Davidson.
- Once you spot the wires, remove the zip ties that hold them together. There should be two of them, one tied at the top and one at the bottom. After removing the zip ties, you can safely disconnect each wire.
- One of the attached wires is trickier to remove than the other. You can identify this connection because it has a little button that you have to press to loosen it.
- Press that button and use your hands to jiggle the wire out of its socket. Don’t apply too much pressure as you don’t want to get any nicks or scratches on the wire.
- To unplug the other wire, simply remove the wire from its socket. There aren’t any buttons you need to press on this one.
- After detaching both wires from the alternator, you can now remove the regulator from your Harley.
Attach the New Regulator

- After taking the old regulator out, don’t place the new one just yet. Take a cloth and clean that area thoroughly. You don’t want any dust or grime in that area.
- Once that’s done, you can place the new voltage regulator in its frame. Replace the wires the same way they were before you removed them. If you’ve forgotten or don’t remember how they were placed, refer to your service manual.
- Remember, the regulator goes in at an angle. Keep adjusting the position a few times till you see the regulator sit perfectly in its place.
- Now, take the ⅜ inch bolts you removed earlier and tighten them on your new regulator with a socket wrench.
- Ensure you clean the old bolts as well. Carefully remove any accumulated dirt or dust.
Connect the Wires to the Alternator
Once you reattach the regulator, connect both wires to the alternator. You want to fit each wire in its prescribed socket, otherwise, the voltage regulator won’t work. Remember the wire that was tricky to remove? Turns out that reattaching it is just as finicky. First, ensure that you fit the wire in its snap. Next, check that it’s centered and balanced. Now, slowly push the wire into its socket till you hear a click.
After attaching both your wires, your new regulator has successfully been replaced.
Tie the Wires
You’re just about done with the entire process. After replacing your regulator and reattaching the wires, you need to tighten the cables to ensure they remain in position. You can tighten the cables with zip ties like they were before.
Keep in mind that you removed two zip ties, one at the top and one at the bottom. The positioning doesn’t matter as long as the wires are safely tied. Once you tighten the wires with zip ties, you can snip the ends.
Retest the Voltage
After replacing the old regulator with the new one, check the voltage again with your multimeter. Follow the same steps you did while checking the voltage the first time. The reading should now be in the ideal range for your Harley. Ensure that you test the voltage when the bike is both idling and revving.
Conclusion
Changing and testing the voltage regulator on a Harley is quite simple. Most of the tools you need are readily available in your local hardware or motorbike supply stores. Sure, you can take the bike to a mechanic or Harley repair shop to get it fixed. But you may end up paying a small fortune for a job that only takes 10-15 minutes max. That’s why I think it’s best if you change the voltage regulators on your Harley Davidson yourself.
Hi Andrew, got a 91 Sporty and up to yesterday afternoon was doing fine. I came back from a ride and
saw smoke down by the shifter. I shut the engine off and felt the connector, it burned my finger wires very hot.
wire were very hot. I had a diode checker put + on lead of RR from the stator (2 pins) and expected a reading. 0
reversed polarity still no reading. Battery was low jumped with truck and burned out jumpers! It turns out the +
from RR that charges the battery internally shorted to ground..