If you’re given the choice of riding your Harley to a given destination and transporting it via a trailer, you’ll most likely choose the former. But we don’t always have that luxury and the only option is to let a trailer carry it. Many think that tying down a Harley or any bike to a trailer is simply pushing the bike up and securing it with some ropes. This can harm your bike to not end because there is much more to this process. Let’s look at how you can do this correctly.
Table of Contents
The Basics of Transporting a Motorcycle
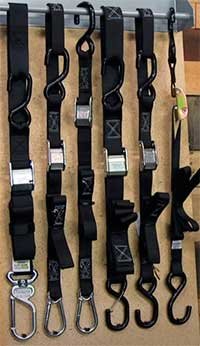
The safety and security of your bike are of paramount priority when transporting it. A shoddy tying-down job can make your bike move around or fall in the trailer. You most definitely don’t want that. The best equipment for the task is bike tie-downs. These are highly important tools used to strap a bike down. There are mainly two kinds of tie-downs: cam buckle or ratchet.
Cam Buckle
These tie-downs utilize the friction created by the strap while it moves through a spring-installed, cam-shaped buckle to keep the strap in its place.
Ratchet Straps
These tie-downs work pretty much the same way, but with a ratchet strap, you will need to continuously secure and tighten the straps.
The kind of tie-downs you want to use is up to you because these straps safely hold the bike in its place and increase the suspension to lessen shock loading.
Shock Loading
While transporting the bike, the trailer will inevitably hit a bump or pothole, compressing the suspension of the bike. When that occurs, the straps on the tie-downs loosens, but as the suspension rebounds, the straps tighten as well. This can eventually tear or snap the tie-downs. Therefore, you must load the suspension more while tying the bike down to lessen the compression.
Materials Required to Tie Down Your Harley Davidson
Your Harley is precious, and you need to treat it right. Don’t start the job without all the tools and leave it incomplete or shabby. Here is everything you are going to need:
- A ramp
- Tie-downs
- Extended metal (preferably aluminum)
- A wheel chock
- A clean cloth (preferably weather and water-resistant)
Strapping Down Your Harley Davidson on a Trailer
Get yourself great-quality tie-downs that will last long to get started. I usually use tie-downs with soft hooks that are integrated into the straps. What are you tying it down to? The trailer right? Here are a few things to keep in mind:
Choosing an Effective Trailer
This is an important, yet mostly forgotten aspect. Trailers are as important as tie-downs in this entire process. Mostly, we check how big the trailer is to see if our bike will have enough space inside. However, this shouldn’t be the only factor we take into consideration.
Ensure it is maintained well
Hire or purchase a trailer that is clean and well-maintained. Check for the number of hooks inside it as well. You need to be able to tie the bike down with ease. Running out of hooks while strapping the bike down will be quite problematic.
Attaching the Ramp
Most trailers come with an in-built ramp but if you have gotten one that doesn’t, you may need to purchase a separate one. To purchase a ramp you need to measure your bike precisely.
First, you need to measure the bike from the middle of the back wheel to the middle of the front wheel. This measurement will give you the bike’s wheelbase. Next, measure the bike from the bottom to the middle of the front and rear wheels. These measurements will give you ground clearance. Now, you’re ready to tie down your bike!
Tie the Strap-Down Around the Handlebar
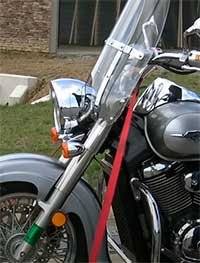
Once you begin, take the tie-down and place it around the handlebar. Avoid all brake lines to prevent cuts or incisions on your brake line. They can cause long-term damage to the bike. Once your strap is around the handlebar, clip it. This prevents the strap from sliding down.
Next, clip the strap on the hook in the ramp nearest to the front wheel. It’s always a good idea to keep the weight of your bike slightly forward and onto the left and right of the bike. Now, tighten the strap. Again, ensure that the strap isn’t interfering with the brake lines or other wires.
This is for one side of the bike. Follow the same method for the other side. For example, if you start with the left side, move on to the right. Most bikes should have two ties in the front and two at the back. But, if you’re extremely paranoid about your bike you can go for four strap-downs in the front and two at the back.
Is a Wheel Chock Necessary?
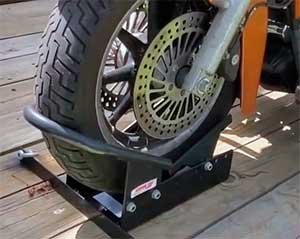
Now, I did mention that a wheel chock would be one of the items required to tie down your Harley on a trailer. However, you don’t exactly need it to complete the job. It just makes your life easier.
If you don’t have a wheel chock and your bike has to be put on a kickstand, start by strapping down your bike from the left side. Next, move on to the right side. Remember, you don’t want to compress your front shocks till it bottoms out your forks. Your tie-downs should hold the bike down snugly. If it’s too tight, your suspensions might get damaged.
Tie-Down the Rear End of the Bike
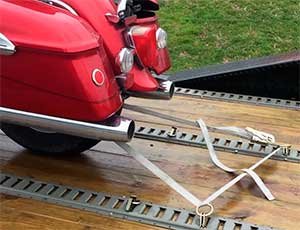
If you’re going for a long trip, you should strap down your rear wheels. Use the same method you used earlier to tie down your straps. Ensure that you angle the straps forward while pulling them down. This helps to keep the wheel in the wheel chock and creates weight on the front-end. This keeps the bike safe and secure.
Manage the Amount of Slack on the Tie-Downs
This is one of the trickiest portions after strapping down your bike. If your straps are too loose, your bike may fall inside the trailer and if the straps are too tight, your suspensions might get damaged. You need to find the perfect fit for your tie-downs. Remember, you want to have a nice and firm grab from the tie-downs. To ensure that your strap-downs fit well, rock the bike side-to-side and see the amount of slack your strap-downs produce. If your cables are a little too loose, cinch them down till your straps are tight enough. I’d advise that you get an extra person to sit on the bike for you to make it easier.
Strap-Down Locations for Larger Harleys
If you have a larger Harley, you may want to search for some more tie-down locations on the bike. For a Harley with inverted forks, try strapping the tie-downs in the front of the engine where the crash bar intersects with the frame of the engine. Once you locate that area, you can strap your bike down.
The bottom line here is, you should try and experiment with strap-down points on the bike. Every bike is different and you won’t have an idea of the parts that can interfere with your straps. The primary goal is to keep each component of your bike safe while the strap-downs are snugly tied around the bike.
A Few Things to Keep in Mind
Don’t Use Rear Bag Guards to Tie-Down the Harley
Rear bag guards may seem like a viable attachment point for your straps, but they’re not. These guards can come right off if you tie them down with your straps. And this goes for almost every other component on your bike. Ensure that you don’t use any fragile parts on your bike as attachment points.
Don’t Strap Down the Ends of Long Handlebars
A few bikers and dealers don’t mind tying down their Harleys from the handlebars, but that can risk the bike’s safety. Some Harleys can compress because they’re mounted with rubber. This can cause your tie-down to slip off the handlebars if you’ve attached them there.
Always Purchase High-Quality Straps
I strongly advise you to never go for cheap straps. You’ve spent quite a fortune on purchasing your Harley Davidson. And that is exactly why it needs the best quality straps to tie it down on a trailer. Cheap straps are at the risk of tearing and breaking down faster.
The price you’ll have to pay for repairing your Harley will be much higher than the money you saved by purchasing cheap and low-quality straps.
Conclusion
I’m sure you’ve never even considered strapping down your bike on a trailer. But if the need ever arises, you need to know how to deal with the situation. Strapping down a Harley Davidson isn’t tough and doesn’t take much time either. Ensure you have the best tools for the job and you’re good to go!
Somewhat informative,should the chock be all the way forward or g balance over axle and is it ok to pull straps from rear end back?
Set your security system to “Travel Mode”, to save your battery.