Harley-Davidson, one of the most famous motorcycle brands in the world, is the dream bike for every motorcycle enthusiast. However, like any other vehicle, a motorbike also requires maintenance and upgrades from time to time. One of the most essential upgrades that a motorcycle can get today is the installation of LED lights. In this article, we will explore the importance of installing LED lights on a motorcycle, the various types of LED lights required for motorbikes, and how to install them on your Harley-Davidson.
Table of Contents
Tools Required for Installation of LED Lights
To install LED lights on your motorcycle, you’ll need the following tools:
● A wire cutter or scissors
● Soldering iron
● A wire stripper
● Rosin core solder
● An electrical tape or a heat shrink tubing that covers exposed wires or soldering points
● Butt connectors, in case you want to crimp your connections and not solder
● A screwdriver
● Drill, for securing any power switches
● Needle nose pliers
To ensure that the installation process is easy and hassle-free, it is best if you assemble and lay out all the tools that you need in an organized manner, pre-determine the spots on your motorbike where you wish to install the LED lights and have a strategy in place as to how to carry out the installation on your own.
Steps for Installing LED Lights
Now that you have all the necessary tools for installing LED lights on your Harley-Davidson, here’s a step-by-step guide to fixing LED lights on your Harley.
Place Your Power Switch

Decide where you would want to position the power switch. Since each motorcycle is different, you need to know what works best for you. Determine the location of your power switch so that it’s clearly visible and easily accessible to you, or for anyone else who wants to ride your motorbike.
Ideally, a power switch should be mounted by drilling a hole, followed by sealing it securely on the top of your motorcycle.
Decide Where to Place Your LED Light Strips
Once you have figured out where to position your power switch, the next step is to determine where you want to place your LED light strips. Some of the most common places where you can position your LED lights include the bottom area where your gas tank is situated, in the front of the bike near the radiator, above the wheels, the rear tail, or in the underbody area of your motorcycle.
However, before installing the LED lights, make sure that they are of the right shape and size, and if not, use a cutting guide to trim your lights to the correct measurement. Also, make sure that the area where you want to position your LED lights is clean and dry.
Installing the LED Lights
Remove the 3M paper backing from the LED lights carefully. Once you have removed the packaging, stick the LED lights to the positions that you decided on.
After you have placed the lights in their respective places, make sure that you press on the surface of the lights to ensure that they are intact.
Disconnecting the Battery of Your Motorcycle
After installing the lights, the next step is to begin the wiring process. But before you start wiring, don’t forget to disconnect your battery’s positive and negative wires.
And make sure that these wires do not come into contact or coil back to the battery terminals.
Determine the Length of the Wires
When measuring the wires, use a wiring diagram that you can refer to and roughly measure the lengths that you require. It is suggested that the wires that you will be running later must be slightly longer, as they can be trimmed later as per requirements, rather than using wires that are of shorter length.
Running the Wires

Once you’ve taken the measurements and cut the wires, start by running them on your motorcycle. Follow the motorcycle manufacturer’s current wiring systems on your motorbike.
Be careful to not let these wires come in contact with heat sources like the muffler or snag on areas like the chain of your motorbike.
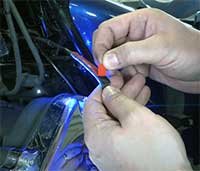
Soldering the Wires to the LED Lights
You can choose to either solder all the connections on your motorcycle or use the butt connectors. The butt connectors can help you crimp the wires if you prefer crimping over soldering the connectors. However, soldering is highly recommended as the connections on your motorbike will last longer and have less wear and tear than with crimping.
To solder the connectors, you can join the different positive and negative ends with each other, followed by soldering a single wire to the main switch or battery. This will help reduce cluttering among wires. So for the lights you’ve just installed on your Harley, go ahead and solder the wire ends that you just ran through the LED light strips.
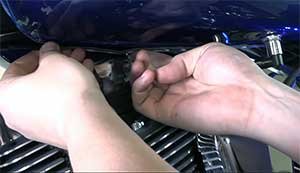
Attach the Terminal and Spade Connectors
Once you have soldered or crimped the wires at the ends of the spade and terminal connectors, you will need to strip off one-fourth of each end of the wire leads, followed by inserting them into the connector.
For this, you will need an electrical crimping tool or a simple pair of needle-nose pliers. Keep the wires in place and crimp the wire and connector together. To make sure that you connected them properly, give the wires and connectors a gentle tug to check whether they are intact and in their position.
Run Your Battery Power Wire
Once the crimping is done, use a power wire to connect the battery’s positive terminal to its switch. For this, you will need to connect a fuse and housing to the power wire.
Cut the loop of a fuse holder from the middle and remove about one-fourth of the length from both ends of the wire. Then, cut a wire with a length of six inches, and repeat the same process — strip off one-fourth of its measurement from both ends. After this, attach a ring terminal connector to one end of the wire and solder it to one of the ends of the fuse wire. The other end of the fuse wire should then be soldered with a running wire that will connect to the on/off switch for the LED lights on your motorbike. This wire will then be attached to the middle terminal of the on/off switch using a terminal connector.
Look for a Grounding Point
After the wires have been soldered and connected, you now need to search for an area on your motorcycle that can be used as a grounding point. Once you have decided the location for a grounding point, sand that area using sandpaper if it has been painted.
Check that the ground wire ring terminal is in contact with raw metal and is not touching the painted surface. Next, use a wire to connect the main switch with the grounding point. On the corresponding wire ends, use a terminal ring and spade connector.
Final Touches
This is the final step in installing LED lights on your Harley-Davidson bike. By now, you should ideally have three wires that have spade connectors that you will use to connect to the on/off switch.
These wires include positive leads from all the LED light strips, grounding wire, and the wire from the positive terminal of the battery. Connect all these wires, and turn on the power switch to check whether the lights are working.
Importance of LED Lights
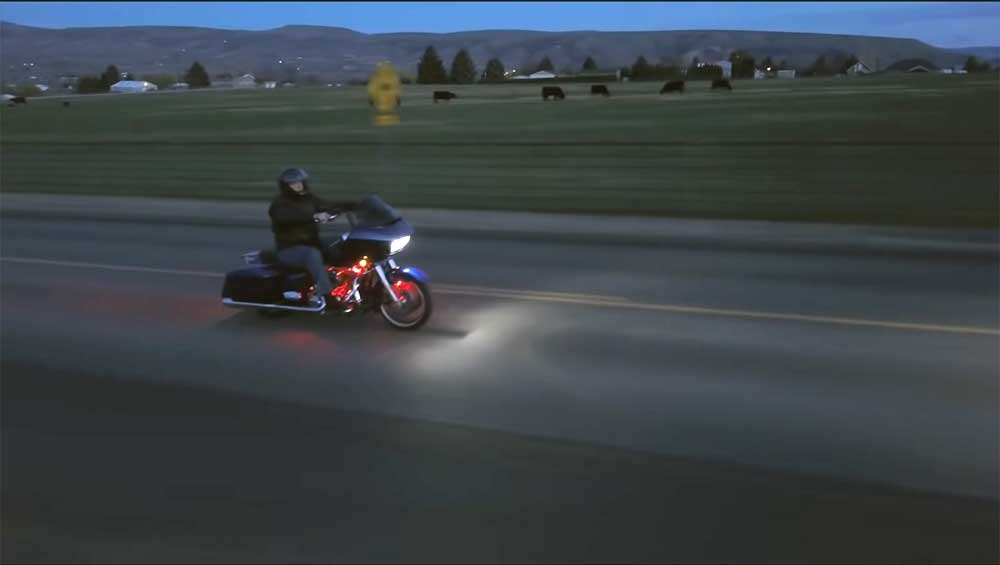
Typically, bikes are equipped with a lot of lights that help the driver see clearly in the dark and make the bike visible to other vehicles. Earlier, motorcycles were installed with simple bulbs, but now, most people prefer LED lights. And why not, since LED lights are brighter, are more durable, and have greater efficiency than a regular light bulb.
In a motorcycle, LED lights act as indicators, thus reducing the probability of collision and other accidents. Although LED bulbs cost quite a bit, their advantages far outweigh their price, making them the go-to choice for installing lights in motorcycles.
Some of the most commonly used LED lights in motorcycles include LED headlights, taillights, and fog lights. Although LED headlamps can be incredibly bright and can blind the traffic, hence increasing the chances of collision of a driver with the other vehicles on the road. So bikers are advised to use their LED headlights judiciously. Generally, LED lights are best used while driving on highways and multi-lane roads with dividers.
Taillights, on the other hand, are considered to be better than LED headlights since they are not only brighter but also last much longer. So even during the day, the vehicle behind your Harley can easily see you, thus reducing the chances of a collision.
LED taillights are also water-resistant, which significantly reduces the possibility of them faltering or malfunctioning.
Conclusion
You have now managed to successfully install the LED lights and can get ready to ride your beloved Harley-Davidson. However, make sure that there are no dangling wires or loose ends and that your lights are firmly attached at their respective locations. You also want to check that there are no wires in contact with any hot areas of the motorbike such as the exhaust.
If everything is in place, you are good to go!