You may not think much of it, but changing the primary oil in your Harley is essential. Many riders tend to procrastinate when it comes to oil changes – even though old motor oil can cause lasting damage to your engine. You might be thinking that changing the primary oil is tough – on the contrary, it’s a fairly straightforward process that requires basic tools and no expert knowledge.
In comparison to cars, motorcycles have simpler technology, smaller engines, and fewer parts – maintaining a motorcycle is much easier and faster. Changing your primary oil is the perfect place to hone your mechanical prowess because it’s easy and doesn’t take too much time – so keep some time aside for your ride and let’s get started!
Table of Contents
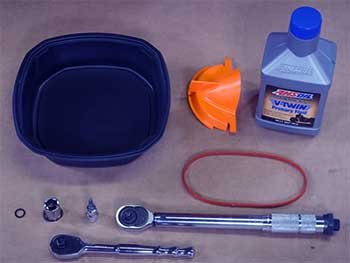
The Tools You Require
Before you begin this procedure, there are few tools that you require. You’ll need:
- A funnel.
- Drain pans or any container that can hold the liquid.
- A new O-ring.
- A ⅝-socket.
- A T27 torque bit.
- A socket wrench.
- A torque wrench.
- A primary cover gasket, if required.
- The correct motor oil for your engine specifications.
Also, keep your service manual handy. These are the tools that most oil changes need, but your service manual may specify special tools that would be required – although this is uncommon.
Additionally, you should always purchase the primary fluid that’s mentioned in your service manual. Each bike has a different set of needs and you can’t purchase any primary fluid you like. This can have serious implications on the functionality of your motorcycle – causing issues such as oil burning, gasket damage, and other unpleasant problems.
How to Check and Change Primary Oil
Now that you have all the tools and knowledge you need, you’re ready to change the primary oil in your Harley. Here’s how to get it done:
Heat Your Engine
Before you begin with changing your oil, it’s best if you switch on your bike for a few minutes. This will heat the engine and smoothen the primary oil, as well as move it throughout the engine uniformly.
A few service manuals advise that you bring your bike to the ideal temperature. That means you should ride your bike for at least a good 30 minutes before getting down to business. If you’re able to do that, then go ahead.
Otherwise, just make sure that you heat your engine to loosen the oil. It’ll make the oil easier to flow out of the primary drain plug and prevent residual oil from gumming up the engine.
Clean the Engine Area
It’s always good to keep every part of your bike spotless and grime-free. Once you heat your engine, place the bike up on a jack or stand. This will stabilize the bike and make it easier for you to work.
Next, take a cloth and clean the engine area thoroughly, especially around the drain case and drain plug. You don’t have to clean the area rigorously with cleaners and other materials. Just give it a nice pat-down so that your working space is dirt-free.
Locate the Primary Drain Plug
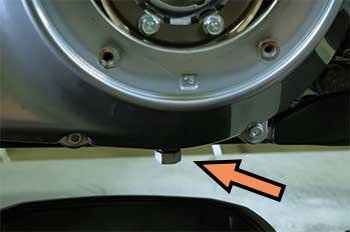
The first step in this process is locating the drain plug. The primary drain plug bolts the oil in, preventing it from leaking. As the name suggests, the drain plug is placed under the primary drain case.
The drain case isn’t hard to spot and you should be able to do so in a jiffy. If you can’t locate it, you’ll find helpful details in your service manual.
Unfasten the Bolts on the Primary Drain Case
Now that you’ve located the primary drain case, take your socket wrench and T-27 torque bit and loosen the bolts on the drain case. Usually, your Harley will have five of these bolts. Once you remove these bolts, ensure you keep them safe since you’ll need them to fix the drain case again.
Once you remove the bolts, remove the cover and set it aside. Now, you’re all set to drain your primary fluid.
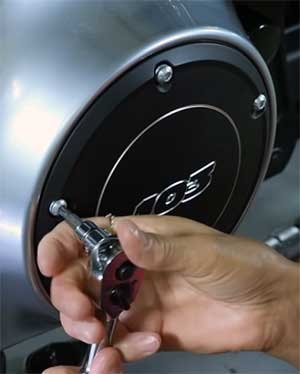
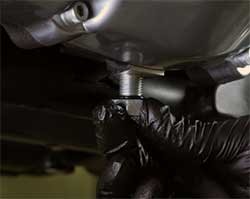
Drain the Primary Fluid
Before you drain the primary fluid, it’s ideal to put on a pair of gloves. Primary fluid can get a little tricky to remove if it gets on your skin.
Now, take your ⅝ inch socket and your socket wrench and loosen the primary drain plug. Once you’ve loosened it enough to be turned by hand, place the drain container underneath the plug. Now remove the plug entirely and let the primary oil flow out.
Ensure that you drain all the oil out. This can take a few minutes – let gravity do its thing.
Replace the Primary Case Gasket
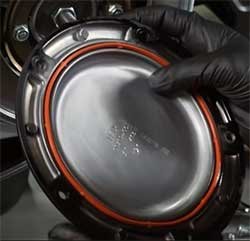
After continuous use, the old primary case gasket can get worn out. It’s best if you replace it with a new one. Remove the old gasket from the primary case cover, if you notice leakage or any gasket damage.
Next, take your new gasket and place it on the cover. The primary case has a groove made for the gasket – the new gasket will fall right into place. You should do this while the primary fluid is draining – it saves you time and gets the job done faster.
Clean the Drain Plug
Always clean the drain plug before putting it back in. This gives you the chance to inspect the plug to gauge if it’s fit for future use. While you inspect and clean the drain plug, take a look at the old O-ring too.
Most service manuals will advise that you change the O-ring after every primary oil change. Therefore, ensure that you’ve bought a new O-ring before a primary oil change.
Now, take the new O-ring and install it into the drain plug like it was earlier.
Put the Drain Plug Back in
Once you’ve cleaned the drain plug and installed the new O-ring, you can fit the drain plug back in. Start fitting the plugs in by hand and tighten them entirely with your socket wrench and ⅝ inch socket.
Once you’ve tightened the drain plug, take your torque wrench and set it to fourteen-to-twenty one-foot pounds of torque. Next, tighten the drain plug using the torque wrench.
Fill the Primary Case with Oil
You will require the funnel for this step. You can purchase a funnel that’s made specifically for primary cases. Otherwise, you can use a normal bike funnel – most are universally compatible.
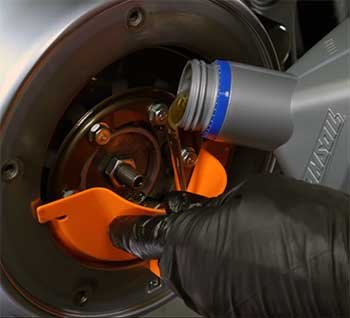
Now, take your oil and pour it into the intake using your funnel. Remember, you need to fill in the exact amount of primary oil that’s prescribed in your service manual. For example, a Harley Davidson Softail requires one quart of primary fluid in its case.
Read your service manual to gauge how much primary oil your Harley needs – if you exceed this figure you will probably cause gasket damage from the high internal pressure caused by excess oil.
Once you’ve added the oil in, ensure that you double-check the level of fluid visually – most motorcycles have a marked sweet spot on the engine.
What is the primary oil capacity?
Don’t worry about how many oz it is or if it does not match the manual, just fill the primary case to the point that it says it is full, usually just up to the bottom of the clutch spring when the bike is upright and level.
Place the Primary Case Cover
After you add the primary fluid, it’s time to install the primary cover. Before placing the primary cover back on, ensure that you have your bolts ready because you’ll have to hold the case in position while tightening each bolt into its holes.
Start bolting them by hand and fit them in snugly with the T-27 torque wrench and socket wrench. The settings on your torque should be 84-108 inch-pounds of torque. Torque all the bolts into their holes and you’re done!
What is the Use of Primary Oil?
Primary oil is the lifeline of your Harley. You can’t start your engine without primary fluid – at least not for very long. Here are some of the major things that primary oil helps take care of:
Lubricates Bike Parts
Primary oil courses through all of your engine’s parts and naturally lubricates them for optimum use. The parts in your engine are all made of metal and need to rub against each other to work. Without lubricant, your engine would seize up and experience major damage through friction.
Utilizes Fuel Better
If your primary oil works well, it’ll drastically reduce the level of friction caused by the parts in the engine. This will enable the petrol in your gas canister to burn more efficiently. If the components in the engine run smoothly, lesser fuel gets utilized. Whereas the engine generates more friction, the bike will require more power to move. This eats into more fuel, bringing down your gas mileage.
Improves the Lifespan of Engine Components
As we said above, components in the engine are made up of metal and need to rub against each other to function. That would naturally create a lot of friction, wearing out internal parts with time. Primary oil creates a layer over each of these parts that significantly lessens the friction created. This increases the lifespan of the components in the engine because the heat generated is much lesser, while fewer moving components get ground away over time.
It depends from bike to bike. Go through your service manual thoroughly to understand when you should be changing your primary oil. Usually, you should change the primary fluid after riding 2500 to 3500 miles – make sure to check your owner’s manual for the right figures.
Keep in mind that these numbers can fluctuate depending on weather conditions and the state of your motorcycle’s engine.
This should take 1 quart (950 ml; 32 fl oz).
According to Harley Davidson, you should always use 20W-50 full-synthetic oil for their Twin Cam engine. The same oil can be used for Transmission and Primary.
Conclusion
This task sounds tougher than it is. You can always go to a mechanic and get your primary oil changed. But remember, changing your primary oil is quite simple and requires very little time and effort. You don’t want to make a trip to your mechanic over a simple task you can do at home. Replacing the oil on your Harley is an efficient way to train your mechanical abilities. So go ahead and follow these steps to replace the primary oil in your Harley Davidson.
Thank you
Great step by step guide easy to follow since this was my first time on this bike.